How to Set Up Quantity Breaks in our Shopify Themes
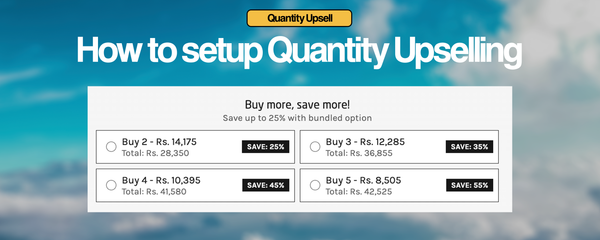
Follow these steps to create a metafield for quantity breaks and structure it correctly to offer discounts.
📌 Step 1: Create the Metafield
1. Log in to your Shopify admin panel.
2. Navigate to Settings > Custom Data.
3. Click Products (since we are adding quantity breaks to individual products).
4. Click Add definition to create a new metafield.
5. Set the Name as "Quantity Breaks" (or any preferred name).
6. Set the Namespace and Key as custom.quantity_breaks.
7. Under Type, select “Single Line Text (List)”.
8. Click Save.
📌 Step 2: Add Quantity Breaks to Products
1. Go to Products in your Shopify admin.
2. Select the product you want to add quantity breaks to.
3. Scroll down to the Metafields section.
4. Locate the Quantity Breaks metafield.
5. Enter quantity breaks in the format "quantity:discount", e.g.:
5:20
10:30
20:50
• 5:20 → Customer gets 20% off when buying 5 items.
• 10:30 → Customer gets 30% off when buying 10 items.
• 20:50 → Customer gets 50% off when buying 20 items.
6. Click Save.
📌 Step 3: Display the Quantity Breaks on the Product Page
1. Open your Shopify theme code editor (Online Store > Themes > Edit code).
2. Locate the product template file (product.liquid or main-product.liquid).
3. Add the following Liquid code where you want to display quantity breaks:
{% if product.metafields.custom.quantity_breaks.value %}
  <div class="quantity-breaks">
    <h4>Buy More, Save More!</h4>
    <ul>
      {% for break in product.metafields.custom.quantity_breaks.value %}
        {% assign split_break = break | split: ":" %}
        <li>Buy {{ split_break[0] }}+ and get {{ split_break[1] }}% off</li>
      {% endfor %}
    </ul>
  </div>
{% endif %}
4. Save the file.
📌 Step 4: Test the Setup
1. Visit the product page and check if the quantity breaks display correctly.
2. Adjust the CSS in theme.css or base.css for better styling if needed.
3. Test adding different quantities to the cart to ensure discounts apply correctly.
📌 Step 5: Apply Discounts in Shopify Scripts (For Shopify Plus)
If you are using Shopify Plus, you can create a Shopify Script to automatically apply the discounts at checkout.
1. Go to Apps > Script Editor.
2. Click Create Script and choose Line item script.
3. Use a Ruby script like this:
cart.line_items.each do |line_item|
  product = line_item.variant.product
  quantity_breaks = product.metafields['custom']['quantity_breaks']

  if quantity_breaks
    quantity_breaks.split("\n").each do |break|
      qty, discount = break.split(":").map(&:to_i)

      if line_item.quantity >= qty
        line_item.change_line_price(line_item.line_price * (1 - (discount / 100.0)), message: "Bulk discount applied")
      end
    end
  end
end
4. Click Save and Publish.
✅ Final Notes
• Metafield type: "Single Line Text (List)"
• Format: "quantity:discount" (e.g., 5:20, 10:30)
• Customization: Modify the Liquid code to enhance the display.
• Testing: Add different quantities to the cart and ensure the correct discount applies.
Now, your Shopify store has a dynamic quantity breaks system ready to boost **bulk purchases and conversions!


